A while ago, I wrote up a small post posting the results of the “blog speedup” I did for my friend Jenn. What I didn’t do was actually explain HOW I did it. This post will dive into the settings and steps needed to make your WordPress blog super-duper fast. NOTE: This will only work on a “self-hosted” WordPress installation. You will not be able to do this if your blog is hosted at WordPress.com.
Install W3 Total Cache
The main tool we will be using is the awesome plugin, W3 Total Cache. This is a plugin that has a LOT of options. Instructions on how to install WordPress plugins are a little out of scope for this article, but if you aren’t sure how to do this, then I’m also a little worried that we’ll be over your head with this. But just in case, here is a hint:

After you have installed it, it must be activated. This is pretty easy. But again, here’s a screenshot.

Congratulations. You’ve installed the plugin. This is the easiest part. Now, buckle up, because it’s gonna get awesome.
Configure W3 Total Cache
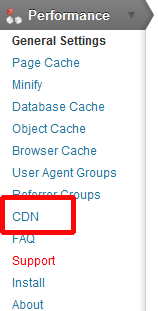
All of the configuration settings can be found under the new “Performance” menu on the left side.

If you expand it out, you’ll see various sections. We’re going to step through each of them one at a time.
General Settings
If you’re a fan of How I Met Your Mother, you probably just saluted when you read this section. Regardless, we will look quickly at the settings you should change in here.
Under “General”, you can leave that one alone for now. We’ll come back here once we have everything set up to actually activate our changes, but you probably don’t want to do that until you’ve completely configured everything.
You also want to leave Minify disabled for now. There is an art to minification, and I’ll dive into it much deeper in another post, but for now, let’s leave it off.
Go ahead and make sure that “Enabled” is checked for Page Cache, Database Cache, and Object Cache. Set it to Disk or Disk Enhanced (if you have other options that show up, awesome, but you probably don’t. Disk Enhanced is generally good enough for most blogs). Then click “Save All Settings”.
Content Delivery Network
Now comes the real fun part – configuring our Content Delivery Network. Basically, with a CDN, we serve up things like scripts, stylesheets, and images to the browser via a distributed network. Why do we do this? Two things: First, it takes load off of OUR server (see this post for more details). But secondly, it can vastly improve the performance of the page, because the browser is now getting those big files from servers that are very close to them, instead of having to go all the way through the internet to get to YOUR server. In this post, I will be demonstrating how to do this with Amazon S3 and CloudFront. There are other CDN’s, but I personally use Amazon. Be advised – this is NOT a free service, and the cost model is totally based upon how much traffic you send thorugh it. That being said, I haven’t found it to be terribly expensive. It is suggested that you watch your usage carefully when you first turn this on – and if it starts to look spendy, you can always turn it off.
Configure the CDN
First, make sure your CDN settings under General Settings look like this, and then click “Save All Settings”.

This will generate an error like this:
Don’t worry! We’re going to fix this. Here’s how. Click on “CDN” in the Performance menu:

Now scroll down to the section titled “Configuration”. You will enter your Amazon Web Services Access Key ID and Secret Key in here:

“Wait a tick,” you are saying. What the hell is an ‘Amazon Web Services Access Key ID and Secret Key’?”
Setting up Amazon
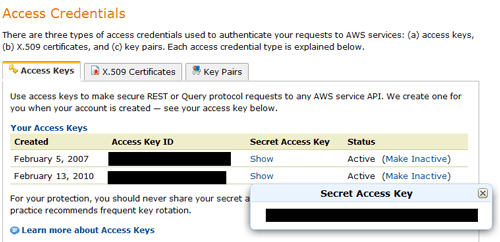
Good question. To get going with this, you will need an AWS account. You will sign up for this at https://aws.amazon.com/. Unfortunately, I already have my account, and I’m not going to create a new one, so you’ll have to go without screenshots. But once you have your account, sign onto the management console and click on Security Credentials:

Scroll down to the Access Credentials section. Here’s where you will find the Access Key ID and Secret Key we just talked about. Don’t worry if you only see one Access Key on your screen. I’m honestly not sure why I have two.

Now that you have entered your Access Key ID and Secret Key into the box, it should look like this (obviously mine are blurred out). Enter in a name for the S3 “bucket” you want to create (I usually do something with the sitename-origin, but you can call it whatever you want) and then click “Create Bucket and Distribution”.

After it has completed successfully, you will see this screen. Click “Close”

Later on, you can change the hostname used for your CDN to something from your own domain by creating a CNAME record. But for starters, leave this as it is, and then click “Test”:

If everything worked, you will see a small green notification that “Test Passed”. Now you can click “Save All Settings”.
Getting the CDN loaded
There are a few housekeeping things we must do in order to get all of our “old” files up to the CDN. One at a time, click the following buttons. Don’t click another button until the previous one has completed.
Each button will pop up a new window. Make sure you click “Start”, and then wait for it to complete before closing the window and clicking the next button. Depending upon the number of images in previous posts, this step could take a long time to complete.
Pushing the Go Button
Now that you’ve got your configuration completed, it’s time to turn it on! Click on the “General Settings” link on the Performance menu, and click “Deploy” under Preview Mode:

Once completed, you’ll get this confirmation:

Success! You have now enabled basic server-side caching, as well as some super awesome Content Delivery Network functionality on your blog.
One Caveat
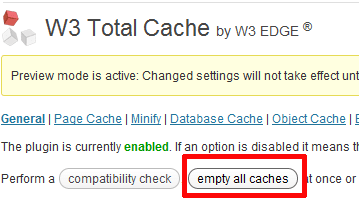
Of course, all this caching comes with a bit of a cost. Any time you make a DESIGN type change to your blog (changing your header, or maybe some styling, etc) you will need to “clear the cache”. You do this by going to back to the General Settings section of Performance, and clicking “Empty All Caches”

I realize that this post is SUPER long and pretty complex. But hopefully it will help you get started on speeding up your WordPress installation. In Part 2, we will dig into some of the other possible settings, including Browser Caching as well as configuring a CNAME for your CDN so it is served from your own domain. Part 3 will discuss the Minify options. Good luck and speedy serving!